Section 1: The Back story*
(If you don't care about the back story, go ahead and skip to Section 2: The Reckoning. Don't worry, I won't be offended, I'll probably skip most of this section myself. It's going to be loaded with typos and incomplete sentences as well as long, incongruous soliloquies about the merits of post it notes in an email society. Do yourself a favor and scroll down several paragraphs.)
As all three of my hardcore readers know, I have an iPhone. It does many a wondrous thing for me from perfecting my ability to create as many words as possible out of six letters to allowing me to watch Dodger games from pretty much anywhere I can get a decent 3G signal (not as easy as you'd think in Chicago). But one of the most useful things it does for me is play music. I listen to music pretty much wherever I go. Up until recently, I'd been using the stock headphones that came with the phone when I bought it. Then this happened:

Anyone that's purchased an iPod or iPhone in the past few years is familiar with that scene. I thought I was immune because that sort of thing only happens in the movies, right? Wrong. So I went down to the Apple store find a new set of headphones that would work proper with my iPhone because I also like to use my headset to take phone calls. If I had been in the market to spend a few hundred dollars, I would have been in luck. They offered several choices for millionaires and the like, but pretty much nothing for my $50 budget, save for another pair just like the ones I already had that would also fail in another six months or so. I had a small temper tantrum, cried a lot, then settled on these:

Yes, they are the
Apple brand in-ear headphones. My logic was this: They received good reviews, they would be covered under my Apple care policy and they were roughly half the price of the competition. They were still more than I wanted to spend, but I was hoping for something that would last me more than six months. I put them in for the walk home and learned three things:
1. You have to lock that cord down or you will hear every step you take as the cord hits your chest and transfers the sound right up to your ears.
2. After about five minutes, those "soft" ear buds start to hurt my ears.
3. The music I listen to has a melody, lyrics and a healthy amount of base.
I was blown away by the sound quality. I had always heard that the stock headphones sounded like crap, but I just passed that off as audiophiles spreading their nonsense and figured the headphones sounded just fine. I no longer hold that opinion.
The sound was phenomenal, but what to do about the pain? I tried to tough it out for a few days thinking I would get used to it, but like my Grandmother always said, I'm a huge sissy. I couldn't hang, so I started looking into alternatives. I briefly considered having my ears removed and sculpting the remaining sound holes into perfect circles to better accommodate the ear buds, but then I realized I'd have to gouge out my eyes because I wouldn't be able to wear sunglasses anymore and all the squinting would give me a headache, so that was out. Then I accidentally stumbled across a website for custom molded earplugs while googling "custom molded earplugs." Custom headphones seemed like a good idea, but spending another $120 did not. Did I mention that I'm currently 14 months into a game of "Which bill shall I skip this month?" Well I am. So I did some research on do it yourself options and didn't find much. The closest I came was some guy who shoved epoxy in his ear, let it dry, broke open an existing pair of headphones and rewired them to his freshly drilled ear shaped glue blob. I respect the spirit of do-it-yourselfers everywhere, but my Grandmother branded sissy status precluded me from attempting such a thing. So I climbed into my thinking tree, got arrested for trespassing and came up with an alternative while trying to avoid being asked to join a "club" of some sort in lockup. Here's what I came up with:
Section 2: The Reckoning
The first thing I did was order some ear molding kits from
here because I'm no chemist and when it comes to sticking things in my ears, I prefer those things to come from a source that purports to know what they're talking about even though I have no way whatsoever of confirming it. Next, I bought a plastic/silicone mold making kit of
this variety. After three agonizingly long days, everything showed up in the mail and I was ready to begin.
Step 1: Read the instructions.
Step 2: Put the junk in your ears. For this step, I recommend having a partner help you out unless you're prone to giggle fits, then just do it yourself. It's a lot harder to do on your own, but not as hard as coming back from the dead because the person that's trying to put this in your ears will kill you if you move around too much. Not because this stuff is that dangerous, but because your moving around will be so annoying that death will be the only option available to the person formerly known as your assistant. Wait about 10 minutes and see if it's ready to take out. The instructions that come with the ear impression kit tell how you'll know when it's ready. Yeah, I could tell you right now, but then you might not read the instructions and I could never forgive myself if that were to happen.


Step 3: Prepare to make a negative of your new ear impression. For this step, I utilized the latest in paper cup and paper clip technology to suspend the ear impression. I thought this would be the easiest way to make a proper negative. It worked on my first try, so if there's a better way to do this, I didn't have to find it. Feel free to try out something new, but this worked for me.

Step 4: Mix and pour the plastic. I was probably a bit impatient at this point and I didn't really read the instructions for the plastic. You might want to do that and see if they give you any tips on how to measure out equal amounts of the two liquids you'll be mixing. I spilled a little bit more than I'd care to admit. Just be careful not to fill up the mold cup past the part of the impression that would be considered outside of the ear, otherwise you might not be able to remove the impression from the plastic once it hardens.
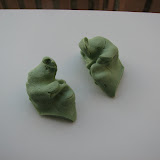
Step 5: Once the plastic hardens (about 15 minutes), you can pull the impression out. After I finished pouring in the plastic, I was 95% sure I had made a horrific mistake and I would never be able to get the impression back out, but I was wrong. It took a little doing, but I got it out completely intact and it's only gotten easier to do since. I've made impressions for my girlfriend as well and the second time around, everything was much easier.
Step 6: Prepare the headphone adapter. For this step, I first took the existing soft ear bud (most headphones of this type come with at least three different sizes: small, medium and large. I recommend using one of the sizes that doesn't fit you at all in case you screw up completely and just want to use your headphones the way they came in the package.) and cut away almost all of the outer portion leaving behind just a little bit on the bottom to help serve as an anchor inside the silicone once you pour that in and around your new "adapter." Then I took a small section of coat hanger and wrapped it in scotch tape until the ear bud fit snugly on it. Then I took a drill bit the size of the coat hanger sans tape and drilled a small hole in the center of the ear canal on the mold that will help keep everything in place when the silicone is poured in. I then made a small notch in the paper cup on the other side to help steady the headphone adapter contraption doohickey as well.


Step 7: Mix and pour the silicone. It takes a very small amount to actually fill the earphone mold. I found it impossible to mix just a tiny bit, so be prepared to pour the excess into whatever you deem appropriate so that you don't feel like you're wasting it. I seem to find half a plastic egg worthy of such a thing. (Yes, silicone bounces) Fair warning, once you start, you might find that there's almost nothing that you don't want to pour this stuff on. It takes about 6 hours to properly cure, so consider doing this at night before you go to bed so you can wake up to a nice treat.
Step 8: You're pretty much done now. Just carefully remove the new ear buds from the mold and shave off the excess.

Having used these for a little over a week now, I can honestly say that they are the most comfortable thing I've ever put in my ear. Not only do they sound great, but they do a great job of blocking out background noise. I walk under the trains as they go around the loop here in Chicago and I can still enjoy my music and better yet, I can still hear what someone is saying to me if I'm on a phone call. When I made a pair for my girlfriend, I used a pair of
Sony MDR-EX36V headphones, and they sound every bit as good as my Apple set (in some ways, they are even better because they really lock into the ear bud. Not that mine are falling out, but hers are much less likely to slip off). They go for $30 at Best Buy, but lack the phone functionality that I need. From the mold making kit I bought, I'd gather you could make 4 or 5 pairs of headphones easily enough, so get some friends together and you can probably bring the price down to about $50/pair (Sony buds, molding kit and impressions kit included) for headphones that will sound phenomenal and feel even better.
I probably missed something in there, so if you have a question, leave a comment and I'll try my best to answer it. I realize this is a pretty short post, so I apologize for not taking up more of your time. Here's some additional pictures if anyone is interested:
*Some of this back story is probably true, most of it is probably not.